Saturday, October 31, 2015

Tea Time

Hello, Diane with you today!

I have a pretty card to share that would be good for a tea loving friend.


I started with a pretty piece of somewhat vintage looking Rose paper from the Joy! 6" x 6" Romance paper pad for one side, and a piece of cream card stock embossed using Anna Griffin Matelasse embossing folder for the other side. A scrap of green ribbon was adhered down between the two.

I know they are not even pieces, but I purposely intended that, as I wanted to show more of the pretty designer paper.

The embossed oval is Sue Wilson Kefalonia from the Greek Island Collection.

I cut two sets of the PoppyStamps Teapot Stack, one for the outline and one to fill in the negative space of the teapots.

I added dots around the teapots, and colored the edge, as well of the oval using Wink of Stella Clear Glitter Pen.


I adhered a pretty pink sheer bow which I then added Pink Mini Rose Buds. Under each Rose I added tiny little leaves from Impression Obsession Leaf Cluster.

To finish Le Creme Pearls were added.

Thank you for visiting with me today!


If you are unable to find an item in the store, or would like something special ordered, please email me at beverly@classycardsnsuch.com. 

Don't forget to check back tomorrow for our next challenge! We have an inspirational photo for you, for our CCNS #109 Gobble Gobble challenge! 

Thanks for stopping by!!! Until next time...


Pin It

Friday, October 30, 2015

Season's Beauty

Good afternoon friends!  Is it snow yet?  Not in Texas for sure! But we can dream can't we?

This card was made using supplies from the Classy Cards 'n Such online store. There are some AMAZING images and sentiments that will make the snow season seem not so far away.


I used a stencil called Winter Snowflake Lace stencil by Memory Box, and my Mini Ink Blending Tool and three colors of blue to color the background.

The sentiment is called Christmas Joy by Sweet 'n Sassy.

The tiny snowflake is from Twinkles by Impression Obsession.

The frame is a die cut by JustRite called Nested Medallion Labels. I thought it sort of looked like a snowflake. I doubled up on some Joy Large Foam Pads to the back and it just popped up beautifully. 

Well, here's to hoping snow is your future soon!  Thanks for looking at my card.


Join the Classy Cards newsletter and get the best deals on our products! It's easy...the sign-up form is on this blog in the black box on the left side. Get 20% off an order of your choice as a newsletter subscriber. What a deal!! 

Thanks for stopping by!!! Until next time...


Pin It

A Starry Night

It is Shirley posting today. I have used my favorite color combo. I like using non-traditional colors for my Christmas cards. I recently made another card similar to this one. I switched up the colors and made this one a night scene.


I started with a pink card base. I added a layer of silver and black card stocks. I cut the pink Christmas tree using the Memory Box Frosted Christmas Tree.

I used a circle punch, and punched circles using black/silver card stock to make ornaments for my tree. I attached the ornaments with Art Institute Dries Clear Adhesive. I adhered the tree to the black card stock.

Next I used a little star punch to make the pink and silver stars. The silver star at the top of the tree was made using the Memory Box Over the Moon and Stars die.

I used Versamark to stamp the sentiment on pink card stock and used Silver embossing powder. The sentiment is from the Impression Obsession Christmas Sentiments.

Thank you, for joining us today.


Join the Classy Cards newsletter list in the upper left column of this blog and receive exclusive weekly deals not available elsewhere! A one-time 20% discount on an order of your choice! Subsequent orders receive a 10% discount. Don't miss out, join today!

Thanks for stopping by!!! Until next time...


Pin It

Thursday, October 29, 2015

Seeds of Today

I love sunflower seeds, along with all the birds and squirrels in my yard.

Mindy here, with a card that is bright and sunny, and corresponds with our challenge this week at Classy Cards 'n Such blog.


I tried a fun technique I saw demonstrated on YouTube, where you can use an edging die over and over to make an interesting and different background for your card background.

I then stamped the Sunflower Stem Pre-Cut Set from Heartfelt Creations on white stock, colored and shaded it with various markers, then fussy cut around the flower and several of the sunflower seeds for my focal image. 

To give the card a little more texture, I added a length of Ivory cotton Cluny Lace across the bottom of the card. Using Joy! Large Foam Pads, attached the flower, along with the sentiment from the set, and a tiny squirrel from the Squirrel Set by Impression Obsession.
To finish my card, I added a little bling with Silver Rock Candy from Queen and Co. for dimension. 

Have a wonderful week, and be sure to join us for our weekly card challenge. It is so much fun, and you could win a wonderful prize if your card is selected. 


There is still time to join our Classy Cards 'n Such challenge. Click on the Current Challenge tab on the right side of the blog for all the details. Come and join the fun!

Thanks for stopping by!!! Until next time...


Pin It

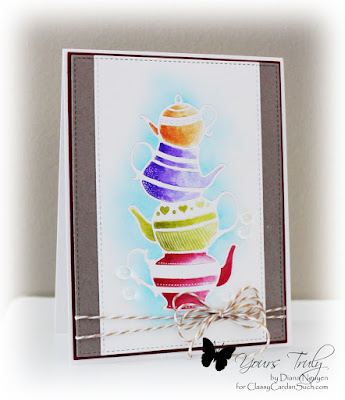
How About Some Tea?

Hello, it is Diana today! Are you feeling the chill in your area yet?  It almost feels like we skip Fall altogether in the mornings here.

I've been drinking tea all day trying to warm myself from the inside out. So it was the perfect time to use this Poppystamps Teapot Stack die again!

Diana Nguyen, poppystamps, teapot stack, watercolor 

This time I combined sponging and painting. I first die-cut the stack of teapots and removed all the dies and the little pieces. I then sponged around the negative space for a soft blue glow with some Broken China.

I then watercolored the different pots with some colors from the Twinkling H2O's Thankful set.

I then used the in-laid die-cutting technique. I trimmed down my panel with the stitched die from MFT Blueprints 13. I first cut out the left side, and then lined it up again to make a skinnier rectangle from the right.

The Kraft layer is the whole MFT die without any trimming.

Finally, thin matting with red card stock using Spellbinders A2 Matting Basics A.

It was a little flat so I added a twine bow before adhering all my layers to a white card base and some details with a white gel pen. 

Stay warm (and healthy)! 


Don't forget to check out the NEW section at Classy Cards 'n Such. Release from 2015 collections and other goodies are being added every day! When you check out, don't forget to enter your discount for a great savings! 

Thanks for stopping by!!! Until next time...


Pin It

Wednesday, October 28, 2015

TOOL SALE!!

Your favorite TOOLS are 15% off!!!

Enter coupon code TOOLS15 at checkout

More than 30 tools to choose from including

Envelope Punch Board
Metal Snippers


Tool 'n One
Some items have very low inventory and cannot be reordered so hurry!!

Click here to start shopping now!

Sale ends November 4th

Pin It

Share the Wealth

Welcome friends, to this weeks sample for Classy Cards 'n Such Weekly Challenge, #108 Squirrel-y Friends. Make a friend card ~ and add a squirrel or bird.

Mindy with you today, and I added some of each, even though my focal image is a beautiful Cardinal.


My focal image is from the stamp called Cheery Cardinal Pre-Cut Set from Heartfelt Creations. I stamped it on off-white stock, colored with various markers, then fussy cut before adding it to a background of printed paper. This was adhered on top of a metallic stock mat, and Kraft card base. I used Joy! Large Foam Pads to attach it to the card. Next, I added the sentiment from the same set, and two small squirrels from the Squirrel Set by Impression Obsession.

To finish my card, I added a few Cherry Chocolate Dew Drops by Robins Nest, just to add a bit of dimension.

I hope you have enjoyed my card, and will join us for our challenge this week.


There is still time to join our Classy Cards 'n Such challenge. Click on the Current Challenge tab on the right side of the blog for all the details. Come and join the fun!

Thanks for stopping by!!! Until next time...


Pin It