Monday, July 29, 2013

Mother and Child

Today our guest designer, Shelly has a beautiful card using a few of the products available at Classy Cards 'n Such.


Shelly also included a step by step description so you can see how easily her card went together.

Mini Fanciful Flourish by Cheery Lynn Designs

1.  Attach designer paper to white card base.
2.  Apply archival jet black with a brayer to the highly detailed  stamp.
3.  Heat set ink.
4.  Color lightly with chalks.
5.  Die cut a frame with an oval within an oval.  Leaving dies attached to paper, run through the die cut machine again using the soft rubber mat to emboss.
6.  Attach flat pieces from paper egg carton to back of oval frame to create a 3-D effect.
7.  Trim mother and child image to fit under frame aperture and attach to card base.
8.  Carefully position frame over image and glue down.
9.  Cut or punch several sizes of flowers.  Shape using Paper Blossoms stylus and  Paper Blossoms Molding Mat.
10. Using a Viva Pearl Pen, place a dot in the center of each flower.  (allow a few hours to dry).
11.  Die cut three Cheery Lynn Designs Mini Fanciful Flourish.
12.  Attach two of the flourishes along one side of the frame.
13.  Artistically arrange flowers on flourishes.
14.  Now cut apart the third flourish and attach in bare spots.


This would be a great card for Christmas!

Click any of the gold links to see or purchase the products Shelly used.

Thanks for stopping by!!!  Until next time...

 
Pin It

Sunday, July 28, 2013

Caged Florals

Hi folks, it's Holly posting today.  I played around with some of the products from Classy Cards 'n Such and came up with this cute little country card to share with y'all.


My card starts with a card base of 8.5" x 4.25" of Kraft cardstock, folded in half.  I cut a smaller piece of polka dot paper from the fun Vintage Bliss 6x6 paper pad and adhered it to the card base.  While I had this paper pad out, I fell in love with the floral text paper, so I cut a 3" square of that and matted it with a slightly larger Kraft cardstock base.

I thought it would be fun to ramp up the "country-ish-ness" of this by adding a panel of chicken wire over the floral paper, so I cut out the Chicken Wire (Cheery Lynn Designs) from Kraft cardstock.  To get this to look silver, I dabbed over the Chicken Wire die cut with the Brushed Pewter Distress Stain - it works GREAT for coloring delicate die cuts like this!

To age the silver chicken wire a bit, I ran a black ink pad over it - just randomly here and there.  I wiped off some of the black ink with a tissue to distress it further - love that look.  It's just a hint of black here and there so the silver really comes through.

Next, I cut a small piece of the polka dot paper and notched the ends with scissors.  I added a little piece of a Mini Fanciful Flourish die cut (Cheery Lynn Designs) to the left side and glued a white button over that.  The last thing I did was cut the Mini Butterfly (Cheery Lynn Designs) and affixed it to the button.


I love these papers!  The butterfly and the chicken wire die cuts match perfectly with these papers for that sweet little country touch.  :-)

I love what Holly did with the chicken wire, don't you??

Click any of the gold links above for more info.

Thanks for stopping by!!!  Until next time...


Pin It

Saturday, July 27, 2013

CLASSY FLASH SALE

Classy Flash Sale!

Order any 2 Flourishes stamp sets 
and get 23% off!!

Sale price for two stamp sets $27.71 plus shipping!!  
Regular price $35.98
You save $8.27!!!

Enter coupon code FLOURISHES at checkout!

This price is available through midnight, Sunday July 28th
 or while supplies last!  
Limited quantity available so get yours now!


  • Classy Flash Sales may occur at any time
  • Products included will vary
  • If you purchase at least $25.00 in addition to the Flash Sale items, you will be entered into a drawing to receive 15% off your next order of $35.00 or more!
Thanks!!!


Pin It

Thursday, July 25, 2013

Beautiful Dahlias!

Hi, It's is Misti again!  

As soon as I saw this Dahlia set from Flourishes, I KNEW I had to have it!  I have tried to grow dahlias & haven't had any luck.  I asked a lady in town who has a really nice garden filled with them & she says the secret is to plant them in pots.  I'm going to try that this fall.  Until then, I'll be able to create with these beauties!  


Supplies Used:
Seam Binding- Chalk White  (Dyed with Peeled Paint Marker)
Tim Holtz Distress Markers: Peeled Paint, Scattered Straw

The dahlias are so beautiful!!!  Thanks, Misti!

If you like Misti's dahlias, why not pin it to your Pinterest board?   You can use the Pin It button below next to my signature!

Click on any of the gold links above for more info.

Thanks for stopping by!!!  Until next time...


Pin It

Wednesday, July 24, 2013

Lightens My Heart

Welcome back to the Classy Cards 'n Such Blog!  I hope you're all enjoying your summer, and that you're keeping cool, and finding plenty of time for crafting.  


I'd like to share another card with you all that I made using some more of the luscious supplies found at Classy Cards 'n Such.  I started out with several different patterned papers from the Webster's Pages Spring Market Combo Pack.  There are SO many lovely patterns in this collection, and each sheet is double-sided giving you even more options at a great price.  

I machine stitched my papers together and used the yellow patterned paper to create a journaling spot with the gorgeous French Pastry Doily Die from Cheery Lynn Designs.  I inked the doily and the edges of my papers with the Tim Holtz Distress Ink in Barn Door Red (LOVE these ink pads, and they're on clearance!!!).  

The sentiment atop the doily/journaling spot is a rub-on from the Friends Set by My Sentiments Exactly - these rub-ons are wonderful and SO easy to use.  I made my bow using Seam Binding that is dyed yellow.  On top of the bow, you will see the sweet little Zva Creative mini paper rose buds in both Classic Red and White.  

You will also see a pretty LeCreme Finesse Pearl Swirl, and what I really love about this item is that you can cut off small pieces of it (as I did here) to get more than one use out of each packet.  Now that's a great deal!  

You will find a lot of products at Classy Cards 'n Such that are sold at a great low price, and can be stretched to use on several different projects.  Enjoy creating, and enjoy your summer!
Thanks, Karen, for a cute card that anyone would love to receive!

Spellbinders D-Lites are still on sale.  Details here.   Get yours now!!

Click any of the gold links above for more information and to purchase the items.

Thanks for stopping by!!!  Until next time...


Pin It

Monday, July 22, 2013

Gold Poinsettia Christmas

Merry Christmas, Classy friends!  It's Holly posting today, and I've created this gold-themed Christmas card to share with you.  


I've used a lot of products from Classy Cards 'n Such on this card so I will list them first and then go through the card-making process with you.

Poinsettia Strip die (Cheery Lynn Designs)
Holly Lace Flourish die (Cheery Lynn Designs)
Polynesian Sails Oval die (Cheery Lynn Designs)
Christmas Sentiments stamp set (Impression Obsession)

I started out by cutting the poinsettias from a dark red paper several times.  I then stacked up different sizes and set a gold brad through the centers.  To give these a bit more of a holiday flair, I rubbed some Platinum Stickles glitter glue around the edges with my finger.  I set these aside to dry.

Next, I cut out the Polynesian Sails die from the Gold cardstock.  I cut the matching Angel Wing from green plaid paper from the Holly Bright paper pad.  I glued the gold die cut onto the green angel wing die cut and set these aside.

I stamped the sentiment onto vanilla cardstock and cut a notch out on the right side.  While I had the vanilla cardstock out, I cut the Holly Lace Flourish several times.

I measured the oval dies to see what size my card base should be, and I ended up with a 9.5" x 6.25" vanilla card base, folded in half.  The red layer is 1/4" smaller on all sides and the gold layer is 1/4" smaller than the red layer.  I ran the gold layer (4.25" x 6") through the Holiday Magic embossing folder.  This embossing folder is larger than regular embossing folders and it worked perfectly for this larger sized card.

Now, with the glitter glue dried on the poinsettias, I assembled my card.  I glued the layers together for the card base, then I glued down the die cut oval piece.  I affixed the three poinsettias to the left side of the oval and then arranged the sentiment so it would be visible above the flowers.  Lastly, I had fun arranging the Holly Lace Flourish pieces all around the flowers until I got them the way I wanted them. 


This card turned out so much better than I had "seen" it in my head.  I love it!  It's going to be hard to give this one away, but I think it would be just perfect for my grandparents.  They are very special to me, and they deserve a special handmade card.  :-)
Beautiful!   Thanks, Holly!

Click any of the gold links above to see the products Holly used.

Thanks for stopping by!!!  Until next time...


Pin It

Sunday, July 21, 2013

Old Tea Rose

Hi!  It's Misti again. I squealed out loud when I saw the announcement that Beverly was adding Flourishes to the Classy Cards 'n Such store!  I love the realistic flowers that they have!!!  I paired up the Old Tea Rose stamp set with the Kaisercraft Porcelain Rose paper pad.  The die cuts in the back are quick & easy to add to a card, no punches needed!  I made this for a lady I volunteer with who is having knee replacement surgery soon.  


Supplies used:
Tim Holtz Distress Markers: Spun Sugar, Peeled Paint

Very pretty, Misti!

Click any of the gold links for more info or to purchase the products Misti used.

Thanks for stopping by!!!   Until next time...


Pin It

Saturday, July 20, 2013

Pretty Posies

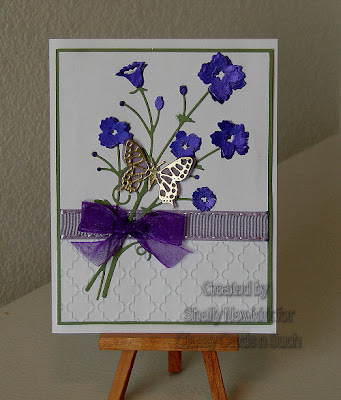
I'm delighted to introduce another of the Classy Cards Guest Designers for this summer!   Please welcome Shelly Newkirk!!   You can see more of Shelly's designs on her blog here.  Here's Shelly's first post!

Hi everyone!   I have a card with pretty posies to share to day.


Here are the Classy Cards products I used.
    Bow Easy    

I first embossed the lower 1/3 of 4 x 5.25 inch piece of white card stock and then placed ribbon over the divide between plain and embossed.  I attached the embossed piece to green cardstock and trimmed the border.  

On the back of the green/white piece, I attached flat pieces of paper egg carton to create a 3-D look.  I recycle my egg cartons instead of using foam pads when I can.  Next, I cut two floral stems, one from white and one from green. Using Twinkling H20s, I painted the flowers on both stems.  You will notice the paint on the green is several shades darker than that on the white.   I cut the flowers away from the white stem.  I matched the white painted flowers to the green flowers that were still attached to the stems.  I offset the loose flowers ever so slightly.  You want a narrow shadow to show underneath the white painted flowers.

I used a white glue and a toothpick to carefully place glue on the back of the stem die to attach it to the card front. The Bow Easy made a perfect bow to place on the stem as shown on the picture.  Then I die cut the Cheery Lynn Designs Small Exotic Butterfly with a metallic paper and an Angle Wings liner for the butterfly.

There are many Memory Box and Spellbinders dies on the Classy Cards 'n Such website that will work wonderfully for this particular design!
detailed, beautiful die cuts!

Stock up now!!!

15% off all Spellbinders D-Lites

Enter coupon code
D-LITES
(all caps, no spaces)
at checkout
This deal ends Friday, July 25th!


Be sure to click on any of the gold links above for more info!

Thanks for stopping by!!!   Until next time...


Pin It

Wednesday, July 17, 2013

Santa with his Sleigh and Reindeer

Merry Christmas in July!  It's Holly posting today, and I'm sharing this card that I created with the amazing new Cheery Lynn Designs dies that were just released a few days ago.


This card is so quick and easy - you could make 50 of these in just a few hours!  It would take longer to address all your Christmas cards than it would take to make these cards.  :-)

I started with Cryogen White Curious Metallic cardstock.  This white cardstock has the most gorgeous shimmer which you can see in the close-up picture below.  I cut one sheet in half to create my card base, and then I used the other half to cut the Santa's Sleigh and Reindeer Border (Cheery Lynn Designs) and the Winter Neighborhood Border (Cheery Lynn Designs).  I then cut a smaller layer of Stardream Lapis Pearlized Metallic cardstock and adhered it to my shimmery white card base.  This Lapis layer is a gorgeous shimmery dark blue color - check it out in the picture below.


After I cut the Winter Neighborhood Border, I carefully stamped the Merry Christmas sentiment (Christmas Sentiments from Impression Obsession) with dark blue ink below the houses and trees.  This border actually cuts out a longer section, about 6 inches.  I cut off about an inch on one side so it would fit onto my card.  I then adhered this border to my shimmery blue cardstock and then I adhered the Santa border right above the houses.

Using this wonderful shimmery cardstock elevates this simple card to one that is special.  There's no need for ribbons or other bulky embellishments that would make this harder to mail.  This card can be mailed as is with just one stamp and the recipient will oooooh and aaaaah over this shimmery gorgeousness.
Beautiful!  Thanks, Holly!

Click any of the gold links above for more info or to purchase the products Holly used.

Thanks for stopping by!!!  Until then...


Pin It

Sunday, July 14, 2013

Sweet Pink Birthday card

It's Karen posting today.  Well, if I do say so myself.....this turned out beautiful!  Just look at these GORGEOUS papers and embellishments from Classy Cards 'n Such


I started with two different patterned papers from the Webster's Pages Spring Market Collection.  The combination of the red gingham and the pink floral is just lovely together.  Next, I used the Spellbinders Labels Eighteen Die-Cut to make a journaling mat.  The birthday sentiment on that mat is a rub-on from the Inspirational Birthday Rubz set.  These rub-ons are priced at just $3 and have several great sentiments on each sheet.  

I embellished the sentiment with some of the love mini rose buds from Zva Creative in Classic Red, Soft Olive and White. I also added a small bow made with a length of Chalk White Seam Binding as well as one of the gorgeous White Pearl Swirls for that elegant touch I was trying to achieve.  All the lovely products at Classy Cards 'n Such make it easy to create beautiful cards and layouts.

Happy crafting!
Such a sweet card, Karen!  Thanks!!

There are LOTS of new products in the Classy Cards shop!   See them all here!

Click any of the gold links for to purchase any of the products Karen used or for more information.

Thanks for stopping by!!!  Until next time...


Pin It

Wednesday, July 10, 2013

LAST DAY FOR FREE SHIPPING!!! Beautiful Poppies

Today is the LAST DAY for FREE SHIPPING, so shop now at the Classy Cards shop and save!!  Click the gold link for details.

Hi!  It's Misti again.  Has summer arrived in your neck of woods yet?  We have 3 days in a row where the temps are supposed to be 108* or hotter.  We had a slow start to summer, but it's making up for it now!   It's a good excuse to stay inside & stamp, right?!  *grin*    The black & white polka dot trendy tape I used added a quick, flat statement to the card.   


Supplies used:

Tim Holtz Distress markers-- Barn Door, Black Soot, Peeled Paint
Love those florals!   Thanks, Misti!

Thanks for stopping by!!!  Until next time...


Pin It

Monday, July 8, 2013

Shasta Daisy Banner Card

Hey, it's Holly posting today.  Remember the Brown Snowflake Christmas card I made the other day?  The doily I used on that card was cut down to fit on the center panel, and I saved the other piece of that doily.  Rather than throw it away, I fiddled around with this card and managed to fit that little piece of doily on here.  :-)


See how I wiggled that scrap of doily underneath the flower?  That just goes to show you - never throw anything away!!  More times than not, you'll make something cute out of it.  The products I've used on this card are:

French Pastry Doily die (Cheery Lynn Designs)
Shasta Daisy strip die (Cheery Lynn Designs)

I found this kraft cardstock in my stash - it had already been stamped for another project and I never used it.  It was just so perfect with these country papers that I decided to go ahead and layer my paper strips on this kraft card base.  So I cut various papers from both of the 6x6 paper pads and used scissors to cut the v-notches at the bottom.  I glued these down to my card base in a random pattern.  The doily piece was glued right at the top of the paper strips.  

A small strip of brown cardstock was paper pierced and then a white gel pen was used to give the Faux Stitching look to the piece.  I die cut the Shasta Daisy strip with dark orange cardstock and attached all the layers together with a vanilla brad.  The petals were fluffed up and curled over using my fingers and then adhered to the top of the card.


I hope you've enjoyed my cute country card today!  Have a great week!
Cute card, Holly!  Be sure to visit the gold links above to see the products Holly used.
Thanks for stopping by!!!  Until next time...


Pin It

Saturday, July 6, 2013

Christmas in July

Hi Classy friends!  I hope you all had a wonderful 4th of July!  For me, it's time to start thinking about Christmas cards, and I've whipped up this card today to share with you.  

The products from Classy Cards 'n Such that I've used on this card are:

French Pastry Doily die (Cheery Lynn Designs)
Lady Kate Edger die (Cheery Lynn Designs)
Snowflake 5 die (Cheery Lynn Designs)
Christmas Sentiments (Impression Obsession) 

I started by cutting some of the papers from the Rejoice 6x6 pad and layering them onto cardstock.  I then cut the doily from cream cardstock, and then I cut off a small section on one side so I could adhere the doily flush to the straight side of the dotted paper.  A dark green Lady Kate edger was glued over the doily and papers and then I affixed the brown snowflake.  The sentiment was stamped on Kraft paper and I used scissors to cut the notches on the right sides of each sentiment.  I arranged the two sentiment flags next to the brown snowflake and then I affixed a button with some linen thread to the center of the brown snowflake.

Have you been thinking about starting your Christmas cards?  There are a bunch of brand new stamps and dies in the store that would be perfect for Christmas cards!  Check them out by clicking on the NEW tab in the Classy Cards 'n Such store.  
Click the gold links above to see the products Holly used on her Christmas card!

Thanks for stopping by!!!  Until next time...


Pin It