Tuesday, July 31, 2012

Pink Flower Flap Fold card


Hey folks, it's Holly posting today.  This is the card I created for the Die Cuts challenge here on the Classy Cards 'n Such blog.  Can you tell which die cuts I've used?  :-)

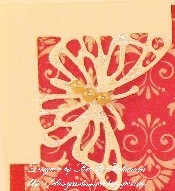
The flower was created with the Build A Flower #1 set, which has everything you need to make a complete flower.  It comes with the leaf, the flower petals, and the stamens and other center flower pieces that you can mix and match to make your own custom flowers.  I die cut everything from a confetti cream cardstock, and then I pulled out my Twinkling H2O's (Think Pink set) and started coloring the flower petals and the leaves.  I actually used all five of the H2O colors to achieve a nice variegated look.  Once the paint dried, I sponged some brown ink over everything to give it a vintage appearance.  You can see the gorgeous shimmer on the petals and leaves from the Twinkling H2O's.  To give the petals and leaves some dimension, I used my fingers to curl up all the edges.  I pushed the spiky center pieces up for even more texture.


My flower is adhered to a Flap Fold card (tutorial from Technique Junkies) and I stamped the sentiment from Birthday Sentiments (JustRite) to the right of the flower.  When you open the first flap, you see this latticed panel.  I die cut a French Lattice Small Frame and adhered the lattice to some paper from the Pretty In Pink paper pad (Glitz), and then I trimmed off the edges.  Isn't that cool?  You don't have to use the entire piece of a die cut - just use your imagination and free yourself from limitations.  :-)


Have you pulled out your dies and created something?  We'd love to see what you've come up with - enter it in our challenge and you might be the next winner!


Such a great card, Holly!   Thanks!!!

All of the challenge details are here.   Please be sure to read the guidelines on this page and enter away!!

Follow the gold links above for more info on each product!

Thanks for stopping by!!!  Until next time...


Pin It

Friday, July 27, 2012

Hibiscus and Quinn Flourish

Hi everyone!


Here's my card for the die cuts challenge.   I chose the red patterned paper from the Magnolia Grove paper pad by Kaisercraft!   Lots of great choices there!!  All of the other paper is from my stash.   BTW - paper pads are 15% off this week.  All of the details are here!


I've been anxious to try out some of the new dies in the Classy Cards shop and this was my chance!   I used the Quinn Flourish as a mat for the Hibiscus, both from Memory Box.  I added a little Mustard Seed Distress Ink with my water brush to the center of the flower which is cut separately.  I put a thin foam pad under the Quinn Flourish for dimension. The Butterfly corners are from Joy! Craft.  I added a little sparkle using the Gelly Roll Stardust Clear Pen and added Baby Pearls down the centers.


I used White Picot Trim to accent the center of the card.  I adhered the trim and the hibiscus with Art Institute Dries Clear Adhesive using the Metal Tip for precision on the tiny trim and around the center of the hibiscus flower. Before I  stamped For You from the Happy Birthday set in the lower right with Versamark, I lightly rubbed my anti-static bag over the area to keep any stray specks of embossing powder from sticking to my card.  I embossed with Silver Detail embossing powder and then brushed away any remaining powder from the anti-static bag with a dry paint brush.


I hope you enjoyed my card with die cuts!   And I hope you will join our challenge and show us your die cut creations!  Details are here!!


Thanks for stopping by!!!  Until next time...


Pin It

CCNS Challenge #13 - DIE CUTS!!!

This challenge is all about die cuts - any brand, any style, old favorites or new releases!  Entries must have AT LEAST one die cut, preferably more - tasteful and classy, of course!  Be creative and show us what you can do!!!

Many of the recent challenge entries have not followed the guidelines below and consequently, could not even be considered for our challenge prize.   Please read our rules carefully before you submit.   We want everyone to play, but please follow the guidelines below.  Thanks!   

Here's how to play:

  1. Make a classy card, tag or other paper crafting project using die cuts (see above).
  2. The card must contain at least one item currently sold in the Classy Cards 'n Such shop.  
  3. The Classy Cards 'n Such item(s) must clearly be listed in the blog or gallery post with the entry.
  4. Post your card or other paper crafting project to your blog or gallery such as SplitCoastStampers.  
  5. Blog/gallery posts with challenge entries must have a direct link back to the Classy Cards 'n Such challenge post.   All gallery posts should include keyword CCNS13 and include a direct link to the Classy Cards 'n Such challenge post if allowed by the gallery.
  6. Upload your project using the InLinkz tool at the bottom of this post and link directly to your blog post or gallery post - not just to your blog or gallery in general.
  7. Entries must be linked to this post by Thursday,
    August 9th at 7AM Central time.
  8. Enter as often as you like as long as the above rules are followed.
The winner will receive a $10 Gift Certificate to the Classy Cards 'n Such online shop!   In addition, we may choose one or two entries to receive the Classiest Card Award!

And now for some examples from the Classy Cards Design Team...


Linda
Holly
Beverly

Over the next few days, I'll post details showing how each card was made.  Subscribe to the Classy Cards blog either via email or with Google Friend Connect to get regular updates!  Both links are on the left sidebar of this blog.
Play along with us by entering your creation with DIE CUTS using the InLinkz tool below!   The winner will receive a $10 Gift Certificate for the Classy Cards shop!

Thanks for stopping by!!!  Until next time...


Pin It

Thursday, July 26, 2012

Winner Challenge #12!!!

Congratulations to Diane H. - entry #11!!!  You are the winner of a $10 Gift Certificate for the Classy Cards shop!!!   Please contact me no later than Monday, July 30th, 5PM Central time for instructions about collecting your gift.


Please be sure to stop back by tomorrow when our next challenge will be posted.  We would love to have you play along!!

Thanks for stopping by!!!  Until next time...


Pin It

Sunday, July 22, 2012

Linda's Posey Patch Flowers


Hello, everyone!  It's Linda with a card for the latest Classy Cards 'n Such Challenge - Handmade Flowers.  The watering can is from the Heartfelt Creations Posey Patch Gardens Delight stamp set.  It was stamped with black ink and colored with colored pencils.   I then stamped several flowers from the Heartfelt Creations Posey Patch Flowers stamp set and cut them out with the matching Spellbinders Heartfelt Creations Posey Patch Die Cut.  These  flowers were colored to match the original stamped image and added to the bouquet with foam dots.  The centers of the flowers were created using the Viva Decor Pearl  Pen.


I used the Spellbinders Teardrop Die Cut to cut out the finished stamped image.  This was layered on top of a purple mat cut using the Cheery Lynn Designs English Tea Party Die Cut.  I used Cheery Lynn Designs Lace Corners Deco - B to highlight the corners of the card.  In the opposite corners of the card and around the the teardrop circle, I added some Want2Scrap Purple Baby Pearls.


If you haven't entered your card in the current challenge, I hope you will do so before time runs out.  We would love to see  all your beautiful creations using handmade flowers!
Beautiful card, Linda!!  I love those posies!

Click the gold links above for more info or to purchase the products Linda used.

The challenge details and link to enter are here.   

Thanks for stopping by!!!  Until next time...


Pin It

Friday, July 20, 2012

Sunflowers on a Birthday Card!


Hi, it's Holly posting today.  Have you played in the latest challenge yet?  Making handmade flowers is so easy when you have flower dies from Classy Cards 'n Such!
I made a Folded Pocket Card (tutorial from Technique Junkies) and I stamped the Vines Cover-a-Card background on the green layer on the bottom.  I die cut some Sunflowers from mustard cardstock and layered two sunflowers together to make them fuller.  The centers of the sunflowers were cut from chocolate cardstock, and I die cut the Stackers Flower #1 Leaf from artichoke cardstock to layer behind the sunflowers.  Don't those just bring a smile to your face?
For the inside of this pocket, I used the negative part of the sunflower die cut and sponged some mustard ink directly onto the tag.  That's a great way to use the "throw-away" parts of your die cuts.  I then stamped the sentiment from the Birthday stamp set over the sponged sunflower.  This tag goes inside the pocket. 
Pull out your flower dies and flower punches and have fun putting some flowers together.  Try mixing and matching your pieces to see what you come up with!  :-)


So cute and easy!   Thanks, Holly!!

Be sure to link your card with handmade flowers to our challenge!   All of the details are here!

Thanks for stopping by!!!  Until next time...


Pin It

Thursday, July 19, 2012

Do Not Be Afraid

Hello Everyone! It's Jennipher joining you today with a 6x6 easel card. This is my first time ever making an easel card and I really enjoyed the process and was happy with the finished project. I hope you like it!


Let me tell you about the process...


To make a 6x6 easel card, I needed to start with a 6x12 cardstock base. I then scored it at 6" and then again at 3". I folded my scored areas and then added a 6x6 cardstock front. Once I had the card made, it was time to decorate it!


I began with a sheet of Damask designer paper from the Glitz Designs Vintage Blue collection. I left it at 6x6 and distressed the edges with a distressing tool and then inked them with Faded Jeans Distress Ink from Tim Holtz. For my next layer I used a sheet of yellow designer paper from the same collection. This particular sheet already has a distressed pattern on it that looks sort of like paint or ink splotches. I mounted it on matching cardstock and then I used the embedded embossing technique on it by running it through my Cuttlebug with the polka dot embossing folder. The next layer was the striped and floral paper. The edges were distressed and inked and then mounted onto a navy blue cardstock base. Before securing to my card, I added a seam binding ribbon.


I used the Fanciful Flourish Die from Cheery Lynn Designs with a piece of Reich Shine Champagne cardstock to create my flourish. It was added on top of all the previous layers a little off center.


Now it was time to add my Scripture which was going to be the focal point of my card. I used the Lacey Circle Die from Spellbinders and cut out a vanilla circle. While the circle was still in the die, I sponged distress ink in the opening. Then I stamped my Scripture in black ink.


I wanted to add a flower to my card front but didn't have one that matched. So, I took a Ceylon White Wedding flower from Prima and blotted it on my distress ink pad. It added just the right amount of blue and the blotted look fit in with the rest of the distressing. For the final touch to the front of my card, I added a row of Royal Blue Rhinestones from Want2Scrap.


Now it was time to add decoration to the inside of my card. I used the same Damask designer paper as the base. For your easel card to stand up properly, you have to add something about 1/3 of the way into the inside of the card. I used a piece of the floral stripe designer paper and punched a lacey border in it. Before adhering it to the card, I took a piece of yellow cardstock and punched the same lacy border in it and then staggered the floral stripe paper on top of it. I used foam pads to adhere it to my card so that it would be popped up and would keep my easel from collapsing when it was open.


Now it was time for my sentiment and finishing touches. I used the smaller lacey circle die and again sponged the inside with distress ink before stamping my sentiment in black ink. I added a few foam pads to this and secured it to the base. To pull it all together, I added another row of Royal Blue Rhinestones.


This card was made for someone very special to me who is about to embark on a journey and is going to need daily encouragement. I thought what could be more encouraging than knowing that our Lord is with us wherever we go! No matter what we may face each day God is right there with us and there is no need to get discouraged or be afraid. I don't know about you but, this certainly makes it easier for me to get up every morning and face the day!


Supplies:
Glitz Designs Vintage Blue Collection
Faded Jeans Distress Ink
Royal Blue Rhinestones
Spellbinders Lacey Circles
Cheery Lynn Designs Fanciful Flourish
Reich Shine Champagne Cardstock
Ceylon White Wedding Flower from Prima
Chalk White Seam Binding


Beautiful card, Jenn!!  Thanks for sharing!!!


We've received several beautiful entries in our HANDMADE FLOWERS Challenge!   Won't you join the fun??  Please be sure to read the guidelines carefully so that you can be considered for the $10 Gift Certificate to the Classy Cards shop!  All of the details are here!


There are gorgeous NEW Joy! Crafts Die cuts - card stands and corners - in the Classy Cards shop!   Be sure to check those out here!


Thanks for stopping by!!!  Until next time...


Pin It

Wednesday, July 18, 2012

White on White


Howdy, it's Holly posting today.  Have you played in the Handmade Flowers challenge here on the Classy Cards 'n Such blog?  This is a fun and easy challenge.  If you have any flower punches or floral dies, pull them out and show us what you create with them.


I went completely white for my card today.  Everything is white except for the sentiment.  The card base and all the die cuts as well as the brads are white.  This makes for a fun change of pace, doesn't it?  The trick with creating all-white cards is you need to have lots of texture to break up all the white-ness.  You can see plenty of texture here with the shaped flowers, the leaves, the intricate oval die and the rounded brads.

I started by stamping my sentiment directly onto the white card base, and then I adhered the Polynesian Sails Oval around the sentiment.  I die cut some tropical leaves and glued those down on the oval, then I die cut some Olive Branches and glued those down on each side.  I die cut a bunch of flower pieces from the Build a Flower #1 set as well as from the Sweet William set.  It was fun to just play around with the various flower pieces and I mixed and matched them until I got a flower I liked.  I used my fingers to pinch some flower petals and fluff up the stamens.  I used white brads to put each flower together, and then I glued them down over the leaves on the oval die cut.


I've used these products from Classy Cards 'n Such to create this card:
Polynesian Sails Oval die (Cheery Lynn Designs)
Tropical Leaves dies (Cheery Lynn Designs)
Olive Branches dies (Cheery Lynn Designs)
Sweet William flower dies (Cheery Lynn Designs)
Build a Flower #1 die set (Cheery Lynn Designs)


I hope you have a wonderful day!
Be sure to upload your projects with beautiful handmade flowers to our challenge


Follow the gold links above to see each product.


Thanks for stopping by!!!  Until next time...


Pin It

Tuesday, July 17, 2012

Pia with Roses

Before I share my card with you, I have exciting news!   Classy Cards has a brand new newsletter format!  Both of our other newsletters - Yahoo and the website newsletter -  are gone, so please be sure to sign up for the new one under the pink envelope and pencil on the left side of the blog!
Cheery Lynn's July Christmas release is available for PRE-ORDER and has been shipped!   Click here to see all of the Cheery Lynn Christmas designs.


Classy Cards now carries Memory Box dies and there are several new Impression Obsession stamps in the shop and a couple of dies, too!   More info on our Weekly Deals page here!
Some friends and I get together once a month to swap cards, learn a technique and share a challenge card.  When we met in June, our challenge hostess gave us each a small package with Pia stamped on white cardstock, some beautiful lavender cardstock, a length of really pretty multi-colored ribbon, a shorter length of lace with cute little bows, and four green pearls.  We could add anything to our card, but we had to use everything in the package.


I cut my card base from Pearlized Esse White Metallic.  I colored Pia with Copics and cut the image with an oval die.   I sponged a little Old Paper ink around the edges of the oval while it was still in the die.  I cut a Swedish Spring Oval out of the lavender cardstock for the second layer.   I used Rose Quartz for the Small French Lattice which I layered on lavender cardstock.


I wove the multi-colored ribbon and lace with bows through the bottom of the French Lattice before I adhered it.   


I used the Miniature Rose die for the lavender flowers at Pia's feet and Olive Branches for foliage from Emerald cardstock.

I cut the miniature roses from the lavender cardstock and used four for each blossom.   On each one, I used one of the styluses from the McGill Paper Blossoms Paper Tool Kit to soften the fibers in the cardstock.   Be sure to mold the flowers where the right side will show on each bloom.  I bent the innermost layer tightly inward with my fingers and then applied a touch of clear-drying glue to each petal so they would remain in a tight bud.   I then layered the other petals, leaving each a little more loose than the last and glued them together in the center.   I found that using my Tweezer Bee made handling of these small flowers much easier!  I placed them on top of the Olive Branches to complete my bouquet.   The final touch was adding the green pearls.


I hope you have enjoyed my little Pia!   She was fun to make and will go to someone special!!


Click on the gold links above for more info.  


Thanks for stopping by!!!  Until next time...


Pin It

Friday, July 13, 2012

CCNS Challenge #12 - HANDMADE FLOWERS!!!

This challenge is all about handmade flowers.  Handmade flowers add a unique and personal touch to our cards!   You may use die cuts, stamped images that are cut out and layered, or ribbon fashioned into a flower.   If I've left a technique out, feel free to share with us by linking your card or project below.

Many of the recent challenge entries have not followed the guidelines below and consequently, could not even be considered for our challenge prize.   Please read our rules carefully before you submit.   We want everyone to play, but please follow the guidelines below.  Thanks!   

Here's how to play:
  1. Make a classy card, tag or other paper crafting project using handmade flowers (see above).
  2. The card must contain at least one item currently sold in the Classy Cards 'n Such shop.  
  3. The Classy Cards 'n Such item(s) must clearly be listed in the blog or gallery post with the entry.
  4. Post your card or other paper crafting project to your blog or gallery such as SplitCoastStampers.  
  5. Blog/gallery posts with challenge entries must have a direct link back to the Classy Cards 'n Such challenge post.   All gallery posts should include keyword CCNS12 and include a direct link to the Classy Cards 'n Such challenge post if allowed by the gallery.
  6. Upload your project using the InLinkz tool at the bottom of this post and link directly to your blog post or gallery post - not just to your blog or gallery in general.
  7. Entries must be linked to this post by Thursday,
    July 26th at 7AM Central time.
  8. Enter as often as you like as long as the above rules are followed.
The winner will receive a $10 Gift Certificate to the Classy Cards 'n Such online shop!   In addition, we may choose one or two entries to receive the Classiest Card Award!


Linda and Holly have some examples to share!


Linda
Holly
Over the next few days, I'll post details showing how each card was made.  Subscribe to the Classy Cards blog either via email or with Google Friend Connect to get regular updates!  Both links are on the left sidebar of this blog.

Play along with us by entering your creation with HANDMADE FLOWERS using the InLinkz tool below!   The winner will receive a $10 Gift Certificate for the Classy Cards shop!

Thanks for stopping by!!!  Until next time...


Pin It