Monday, April 30, 2012

Italian Flourish and Roses - 3D art!!!


Hello Classy Cards 'n Such Friends! This is Chrissy D sharing a card with you today! I had so much fun playing as I created this birthday Card! 

I started with peach cardstock and ran it through my die cut machine with the Dots embossing folder. I adhered it to a strip of black cardstock. I used the Italian Flourish Doily from Cheery Lynn Designs cut in the Layering Swatches #2 Deep variety- black. I cut the Italian Flourish Doily in half using my paper trimmer and used the Quickie Glue Pen to adhere it to the 5 1/2" x 8 1/2" vanilla cardstock.

I used the Fanciful Flourish Die from Cheery Lynn with olive cardstock and adhered it using the Quickie Glue Pen. I then added the peach and black panel and adhered the Tea Rose Latte Mulberry Roses with glue dots. I wrapped the Eggshell Seam Binding around and tied a bow to finish off the embellishments. Once everything was pieced together and adhered, I stamped the sentiment from the Topsy Turvy Cakes stamp set from JustRite.


This card was a QUICK card to make and I love how the Italian Flourish Doily and Tea Rose Latte Mulberry Roses jazz it up! These dies are so much fun to play with!  
Thanks, Chris!!!  This beautiful card is another example that would qualify for entry into our current 3D challenge!! All of the details are here!  Won't you join us???

Thanks for stopping by!!!  Until next time...


Pin It

Friday, April 27, 2012

Linda's 3D Challenge Card!!!

Linda chose a card from the Easel 3D Card - Florals mirror design set 4 for her challenge card.  These 3D cards are available in a kit with four beautiful designs!   They are all very easy to assemble!  The pieces are all numbered, so just layer them in the numbered order using the Joy! Foam Pads large and small.   Easy peasy!!


The card bases in coordinating colors and envelopes, all of very nice quality paper, are included in the design sets.  There are three sets to choose from, so head on over and get yours here!


Linda added pearls and a Thank You Rubz for her personal touch!   So pretty!!!


Enter your 3D card in our challenge to be eligible to win a $10 Gift Certificate to the Classy Cards shop!   Details are here!


Mother's Day is just around the corner!  All of our lace, trim and ribbon are on sale!    There are new items in the shop too!!  Details here!


Thanks for stopping by!!!  Until next time...


Pin It

Wednesday, April 25, 2012

Debbie's Darling Daisies Birthday Card


This is Debbie with my first 6" x 6"  card. I love the Butterflies cardstock so much I just hated to cover it!

Most of the items for this card can be picked up from Classy Cards 'n Such:  
I started by stamping the JustRite Celebration stamp on Cryogen white, and coloring it with Copic markers and cut it out.  On top of this, I layered the purple designer paper and then put the Picot Edge Circle on top of that.  I stamped the saying from the Birthday Sentiments collection and cut this out with a Circle die cut.  These were mounted on designer paper which I then put on the Butterflies cardstock.  I love this Butterflies cardstock! Make sure you go to the Classy Cards website for a better look.

I made the flower in the upper corner using the Darling Daisies die cut. This one is a must have if you like the smaller flowers.


Thanks, Debbie!

Join our Classy Cards Yahoo! Group here for a 20% discount on an order of your choice and great weekly deals!

Thanks for stopping by!!!   Until next time...


Pin It

Monday, April 23, 2012

Debbie's Challenge #6


This card was made for the Classy Cards 3D Challenge!!  I used something different on this card, a kit that is sold by Classy Cards 'n Such.   I  saw this in a magazine and thought they were so pretty and I had to give this a try.

The kit I used was the Easel 3D Card Floral Mirror Design set 1.  You also need the Joy! Foam Pads to assemble the 3D focal point.  I needed to dress it up a little bit so I used a Cheery Lynn Exotic Butterfly small (formerly called mini), and the Cheery Lynn Lace Corner Deco A.  I added some small pearls and added dimension with foam mounting tape under the sentiment to finish my card.


This is a really simple and easy kit to work with and they leave you some space to make the card your own or just leave it as it came from the kit. It's great either way!

Make sure you show us your 3D art work by joining in the challenge.  Details here!

Thanks!!

Debbie 
Hop on over to the 3D section of the Classy Cards shop and pick out some 3D art to create!

Thanks for stopping by!!!  Until next time...


Pin It

Sunday, April 22, 2012

Chris' Challenge #6


Hello Everyone! This is Chrissy D! Welcome to the Classy Cards 'n Such Blog! This week Classy Cards 'n Such is challenging you to make a 3D project! For my project, I created a Goodie Purse using the Technique Junkie Newsletter 3-D and Fun Folds CD! This little purse is so fun to make and decorate. It would be a perfect inexpensive gift to fill with lip gloss, candy or even a gift card or cash!

I started the purse by using patterned paper. Classy Cards 'n Such has a BEAUTIFUL array of Patterned Papers for you to design with! The words I used on my project come from the JustRite Stamp set called Topsy Turvy Cakes.

To create the cute little flower, I used the Miniature Rose Die from Cheery Lynn Designs along with the Paper Blossoms Tool Kit to help curl the flower blossoms. To adhere all of the little blossoms together, I used the Sakura Quickie Glue Pen. To complete the flower, I added the Viva Decor Pearl Pen Ice White on the internal portion of the flower and around the scallop punch layer to decorate the words a bit. To further embellish this cute little purse, I added a bow using the Red and Green Doodle Twine - Christmas Assortment.


Some additional tools that I used are:
Scallop Punch, 1 3/8" Circle Punch, 1 1/2" Circle Punch, Scallop Border Punch, 1/16th hole punch, Scoring Tool, Large Oval Punch, Magnets

I hope you will join us in the 3D Challenge! Have a wonderful day!

Thanks, Chris!  Cute purse!!!

Be sure to check out this week's deals here!!

My first order of the new Tim Holtz Distress Ink Markers has finally shipped and should arrive sometime next week.   There is only one set in this order that has not been claimed.  This is the only remaining set that will sell for $97.99!   If you want a great deal on these markers, order yours now!   Another order is pending, but I don't have a delivery date.  The second shipment of markers will sell for the MSRP of $114.99.

Thanks for stopping by!!!  Until next time...


Pin It

Friday, April 20, 2012

CCNS Challenge #6 - 3D Art!!!


Welcome to the Classy Cards 'n Such challenge #6 - 3D ART!!!  For this challenge, we are looking for your classy cards which have dimension and depth!  Check out the 3D Art section of the Classy Cards shop for great pre-cut art projects, some of which are card kits, which can be layered using tiny foam pads and then enhanced however you would like.  Cards with layers, decorative boxes and purses are also great 3D projects!  


Here's how to play:

  1. Make a classy card, tag or other paper crafting project using 3D ART (see above).
  2. The card must contain at least one item currently sold in the Classy Cards 'n Such shop.  
  3. The Classy Cards 'n Such item(s) must clearly be listed in the blog or gallery post with the entry.
  4. Post your card or other paper crafting project to your blog or gallery such as SplitCoastStampers.  
  5. Blog/gallery posts with challenge entries must have a direct link back to the Classy Cards 'n Such challenge post.   All gallery posts should include keyword CCNS06 and include a direct link to the Classy Cards 'n Such challenge post if allowed by the gallery.
  6. Upload your project using the Inlinkz tool at the bottom of this post and link directly to your blog post or gallery post - not just to your blog or gallery in general.  
  7. Entries must be linked to this post by Thursday, May 3rd at 7AM Central time.
  8. Enter as often as you like as long as the above rules are followed.
The winner will receive a $10 Gift Certificate to the   Classy Cards 'n Such online shop!   In addition, we may choose one or two entries to receive the Classiest Card Award!


Here are a few projects from the design team!
Debbie

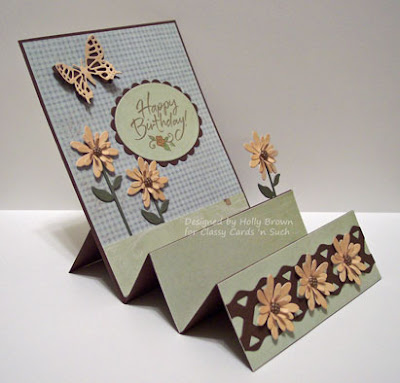
Holly

Chris

Linda

Beverly


Be sure to share your classy creations with us by using the Inlinkz tool below!  Good luck to everyone!!


Thanks for stopping by!!!  Until next time...


Pin It

Thursday, April 19, 2012

WINNER - Challenge #5!!!

Congratulations to Sylvia Blum, entry #3!!!  You are the winner of a $10 Gift Certificate for the Classy Cards shop!!!   Please contact me no later than Monday, April 23rd 6PM Central time for instructions about collecting your gift.
Thanks to all who played along with our bling challenge!!!   I'll be posting our next challenge tomorrow so be sure to check back then!


Thanks for stopping by!!!  Until next time...


Pin It

Monday, April 16, 2012

God is My Hero

Hello everyone! It's Jennipher and I'm finally back with a card for Classy Cards 'n Such. It's been quite awhile!

Today's card was inspired by a challenge to make a card for your hero. Well, I don't know about you but, I'm constantly calling on God to get me out of a jam or to help me deal with the latest test in my life. 


So, it only seemed fitting to use the "Footprints in the Sand" poem on my card.  I started with a base of Cocoa cardstock. I added a distressed layer of French Kiss patterned paper by Glitz Designs. To the distressed edges I added Pumice Stone distress ink. On top of the patterned paper is a strip of Parrot Green/Yellow ribbon. For a finishing touch I added a Ceylon Attic flower by Prima (still available in Garden & White Wedding).

Supplies:
Cocoa Cardstock
French Kiss Glitz Designs Patterned Paper
Pumice Stone Distress Ink
May Arts Parrot Green/Yellow Ribbon
Prima Ceylon Attic Flower


Thanks, Jennipher, for a beautiful card using one of my favorite poems, too!!  I'm glad you are back!!


Our BLING challenge ends Thursday, but there is still plenty of time for you to enter and be eligible for a $10 Gift Certificate from the Classy Cards shop!   Details are here.


AND...to help soften the blow of Tax Day, all orders in any amount received April 17th or April 18th will receive a free gift!


Thanks for stopping by!!!  Until next time...


Pin It

Sunday, April 15, 2012

Holly's Challenge #5


Hi folks!  It's Holly posting today, and this is the card I created for the latest Classy Cards 'n Such challenge - Bling.  I've used several different types of bling on this card - glitter, rhinestones, and a bling swirl!  Here are the items I've used from Classy Cards 'n Such:

Dream stamp set (Stampavie)
Cyclamen glitter (Sparkle 'n Sprinkle)
Victorian Picket Fence die (Cheery Lynn Designs)
Olive Branches die (Cheery Lynn Designs)
Exotic Butterfly small die (Cheery Lynn Designs)
  
I wanted to create a fun little scene, so I started by sponging some distress inks on white cardstock.  I sponged Tumbled Glass and Broken China distress inks around the top of the card, and then Shabby Shutters and Peeled Paint distress inks at the bottom.  I cut out a butterfly and added some Cyclamen glitter all over it (Glitter Roll technique from Technique Junkies), and then added it to the top of the card.  For the bling trail, I cut a small section of the Beautiful Bling Borders and adhered it below the butterfly.

The fence was cut from kraft cardstock, and I adhered the die cut leaves in various places around the fence before adhering the fence to the card.  The sentiment is stamped above the fence with black ink.  For the flowers, I punched some from pink cardstock, and then I used one of the tools from the Paper Blossoms Tool Kit and the Paper Blossoms Craft Molding Mat, and rubbed the tool in the middle of the flowers to make them curl up.  I added the rhinestones to the centers of the flowers and then adhered the flowers to the fence.  The white cardstock was then adhered to a kraft card base.


Thanks, Holly, for another cute card!  Click the gold links above to go directly to the item in the Classy Cards shop!

We would really enjoy seeing what you have created with the products sold by Classy Cards!   You can do that when you like us Facebook here!  In addition, I've created a special discount only for Facebook followers!

Thanks for stopping by!!!  Until next time...


Pin It

Saturday, April 14, 2012

Linda's Challenge #5


Hello everyone!  It's Linda back with a card for our Classy Cards 'n Such Challenge - Bling.  This is such an easy challenge for me because I love to use all the beautiful bling that Beverly has in the Classy Cards 'n Such shop.
For this card, I cut and layered mats and adhered them using Scor-Tape.  I then die cut the Italian Flourish from Cheery Lynn Designs and added it to my mat.  The flower was made using the Spiral Blossom One from Spellbinders.  I used one of the diecuts for the basic flower and then cut several others in order to have flower pieces to insert into the original flower to make it as full as I wanted it. For my bling, I added the Want2Scrap Finess Swirls under the flower.  The ribbon is the Champagne - Sheer Asiana with a bow tied with the Bow-Easy.  I finished the card off with a couple of stick pins.


I hope you have enjoyed my challenge card today and that you will submit your creations for our new Classy Cards 'n Such Challenge - Bling.
Thanks, Linda!!!

Classy Cards has another great sale going on!  JustRite stamps with the matching Spellbinders are on sale through Friday, April 20th while supplies last.   You can get all of the details here!

Thanks for stopping by!!!  Until next time...


Pin It

Thursday, April 12, 2012

Debbie's Challenge #5


Classy Cards 'n Such is having a bling challenge, and you all know I love my bling!  So this is one I had a blast with!  

The supplies that I used and can be purchased at Classy Cards are:


Other Supplies: Oval Spellbinders, black ink, blue paper, brown paper, double stick tape, glue dots, Copic markers


I started by stamping Sofia Wishes on White Cryogen cardstock.  This is the paper I choose for all of my cards that I color with Copic markers.  You get a really great blend on this paper!

I cut Sofia out using an oval die cut and outlined the cut edges with a brown marker.  I cut out the Lattice Rectangle on blue paper.   I wanted to see how hard this Nestabling might be to use so I had to put it on right then. And guess what??  It was easy, guys!!!  Will I buy more??  That is a big YES!!

I layered the lattice rectangle on brown paper and then back onto blue.  Finally, I added a brown Prima flower in the corner.


Make sure you you stop by the challenge blog and show us your bling!  When you enter your creation in the challenge, you are eligible to win a $10 Gift Certificate from Classy Cards!   Just think of all the bling you could buy with that!   

Thanks!

Debbie 

Thanks, Debbie!  Sofia is so cute!!   Won't you all join us in our challenge??  If you need to stock up on bling, it's on sale this week!!!  Details on bling and more here.

Thanks for stopping by!!!  Until next time...


Pin It

Monday, April 9, 2012

A Shimmery Rose

Recently, we needed a special anniversary card for some very wonderful, long-time friends.   I just love the new shimmer roses in the Classy Cards 'n Such shop, so I decided to make my card with the shimmer rose as the focal point.


I started with a base of 11" x 5 1/2" of Pearlized Esse White Metallic cardstock.  The picture in the shop appears blank, but it's because this is such a gorgeous white that it blends right in with the background.  One side has tooth which I used for the outside of the card and the other is more smooth which makes writing a tad easier.   I scored at 2 3/4" from each long end to make the gate-fold card.   The Scor-Buddy is great for scoring!


I used the largest Spellbinders Picot Edge Circles for the focal point and the #2 (second to smallest) for the butterfly. Both circles were cut from Rose Quartz cardstock.  


Have you seen the new Tropical Leaves set by Cheery Lynn?  These leaves have really caught my eye and I'm pretty sure I will be using them a lot!!! There are five different leaves so you can really get a lot of mileage from this set!  I cut three of these leaves plus a Tropical Flourish from Stardream Emerald to go with the Purple Shimmer Rose.  The shimmery quality of these roses does not show well in the pictures, but it is there! I placed a larger white pearl in the center of the rose.  The 2" shimmer roses are also available in white.  Sooo pretty!!!


I added White Baby Pearls around the edges of each of the Picot Edge Circles and down the body of one of the Small Butterflies (formerly Mini Butterflies).  The butterfly was cut from Stardream Ruby which perfectly matched the purple rose!   I also cut a matching Angel Wing from white vellum.  I hope you can see the Angel Wing on the close-up!  It's a very pretty effect!!


After adhering all of the layers, I attached half of the large Picot Circle to the right side of the card with foam pads.  Then I held the right side closed so I could get the correct placement for the smaller circle with the butterfly which I also attached with foam pads.   The smaller circle should be over the edge of the larger circle to keep it closed.


Even though I used this for an anniversary card, it could easily be a special birthday card, sympathy, wedding, get well and more.   


Bling is on sale this week which coordinates with our current challenge!  It's a great time to stock up on some beautiful bling and enter your own creation in the challenge!


Thanks for stopping by!!!  Until next time...


Pin It

Friday, April 6, 2012

CCNS Challenge #5 - BLING


Welcome to the Classy Cards 'n Such challenge #5 - BLING!!!  For this challenge, we are looking for your classy cards which have pearls, rhinestones and/or glitter!  Pearls and rhinestones just add an extra layer of class to our projects, don't you think??  The Classy Cards shop has a large selection of bling which you can see here!  Glitter is here!


Here's how to play:

  1. Make a classy card, tag or other paper crafting project using BLING (see above).
  2. The card must contain at least one item currently sold in the Classy Cards 'n Such shop.  
  3. The Classy Cards 'n Such item(s) must clearly be listed in the blog or gallery post with the entry.
  4. Post your card or other paper crafting project to your blog or gallery such as SplitCoastStampers.  
  5. Blog/gallery posts with challenge entries must have a direct link back to the Classy Cards 'n Such challenge post.   All gallery posts should include keyword CCNS05 and include a direct link to the Classy Cards 'n Such challenge post if allowed by the gallery.
  6. Upload your project using the Inlinkz tool at the bottom of this post and link directly to your blog post or gallery post - not just to your blog or gallery in general.  
  7. Entries must be linked to this post by Thursday, April 19th at 7AM Central time.
  8. Enter as often as you like as long as the above rules are followed.
The winner will receive a $10 Gift Certificate to the   Classy Cards 'n Such online shop!   In addition, we may choose one or two entries to receive the Classiest Card Award!


Here are some ideas from the Classy Cards Design Team to get you started.


Linda

Beverly

Debbie
Holly


Over the next several days, I'll post each card individually so that you can see how each was made.   Show us your classy creations by using the InLinkz tool below!  Good luck!!


Thanks for stopping by!!!  Until next time...


Pin It